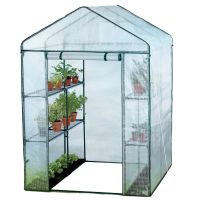
The complete garden tunnel perfectly protects your plants and fruits from adverse weather conditions or pests. It is a fantastic alternative for enthusiasts of growing crops in the garden and on the property.
The polytunnel will speed up and improve crop growth and create the right microclimate for your fruits and plants.
Why is it worth it?
- Tunnel dimensions: w-2m d-3m h-2m (+/- 5cm)
- Door size: 80 x 180 cm
- Material: 140g/m² PE film with UV4 filter
- Green PP mesh embedded in the foil cover protects against tearing
- Galvanised metal frame
- Ground collar for burying in the ground
- Velcro windows with mosquito nets
- Wide zipped roll-up door
- Ground fixing kit
- Clear user manual
- Weatherproof
Additional 2 tubes for climbing plants
- The tunnels have the function of hanging laces for plants such as tomatoes, peas or asparagus.
The bottom collar should be covered with soil
- Protects against unwanted pests and stabilizes the structure.
PE film 140g/m² with UV4 filter
- Green PP mesh embedded in the foil cover protects against tearing
Stable frame connected by screws
- Thoroughly galvanised with plastic closures
- Tube thickness: 0.6 mm,
- Tube diameter: 19mm,
Zippered door closure
- Allows quick and easy access inside the tunnel
Rolling doors and windows
- Attached to a fixed strap. Windows fitted with mosquito nets.
Set of wedges
- Strengthen the structure of the tunnel.
The cord is attached directly to the frame with straps
GardenLine Tunnel Installation Guide
Our tunnels are equipped with 2 additional top tubes, which provide stability and allow the tying of cords for climbing plants.
Step 1. Assemble the basic elements described in the user manual
Step 2. Install the screws into the holes and tighten them slightly so that they do not put any resistance. Do not tighten them completely
Step 3. Join the pipes into curves. Screw the finished elements onto the previously installed screws from step "2".
Step 4. Place the first arch vertically and block it with the diagonal pipe.
Step 5. Place all the arches, connecting them to the top crossbar. Do not tighten all the screws completely.
Step 6. Install the remaining crossbars and pipes diagonally. When all the elements are assembled, you can tighten the screws completely. Install the foil and anchor the tunnel into the ground. If there are strong wind gusts in your area or if the greenhouse is in an open area, it is worth securing it with additional anchors in the ground, such as metal rods.
Additional information:
The polytunnel will accelerate and improve crop yields and create the right microclimate for the crop.
Specified Use:
Protecting plants from adverse weather conditions, i.e. rain or hail, but also from animals.
Package dimensions: 17 x 28 x 110 cm
Gross weight: 17 kg